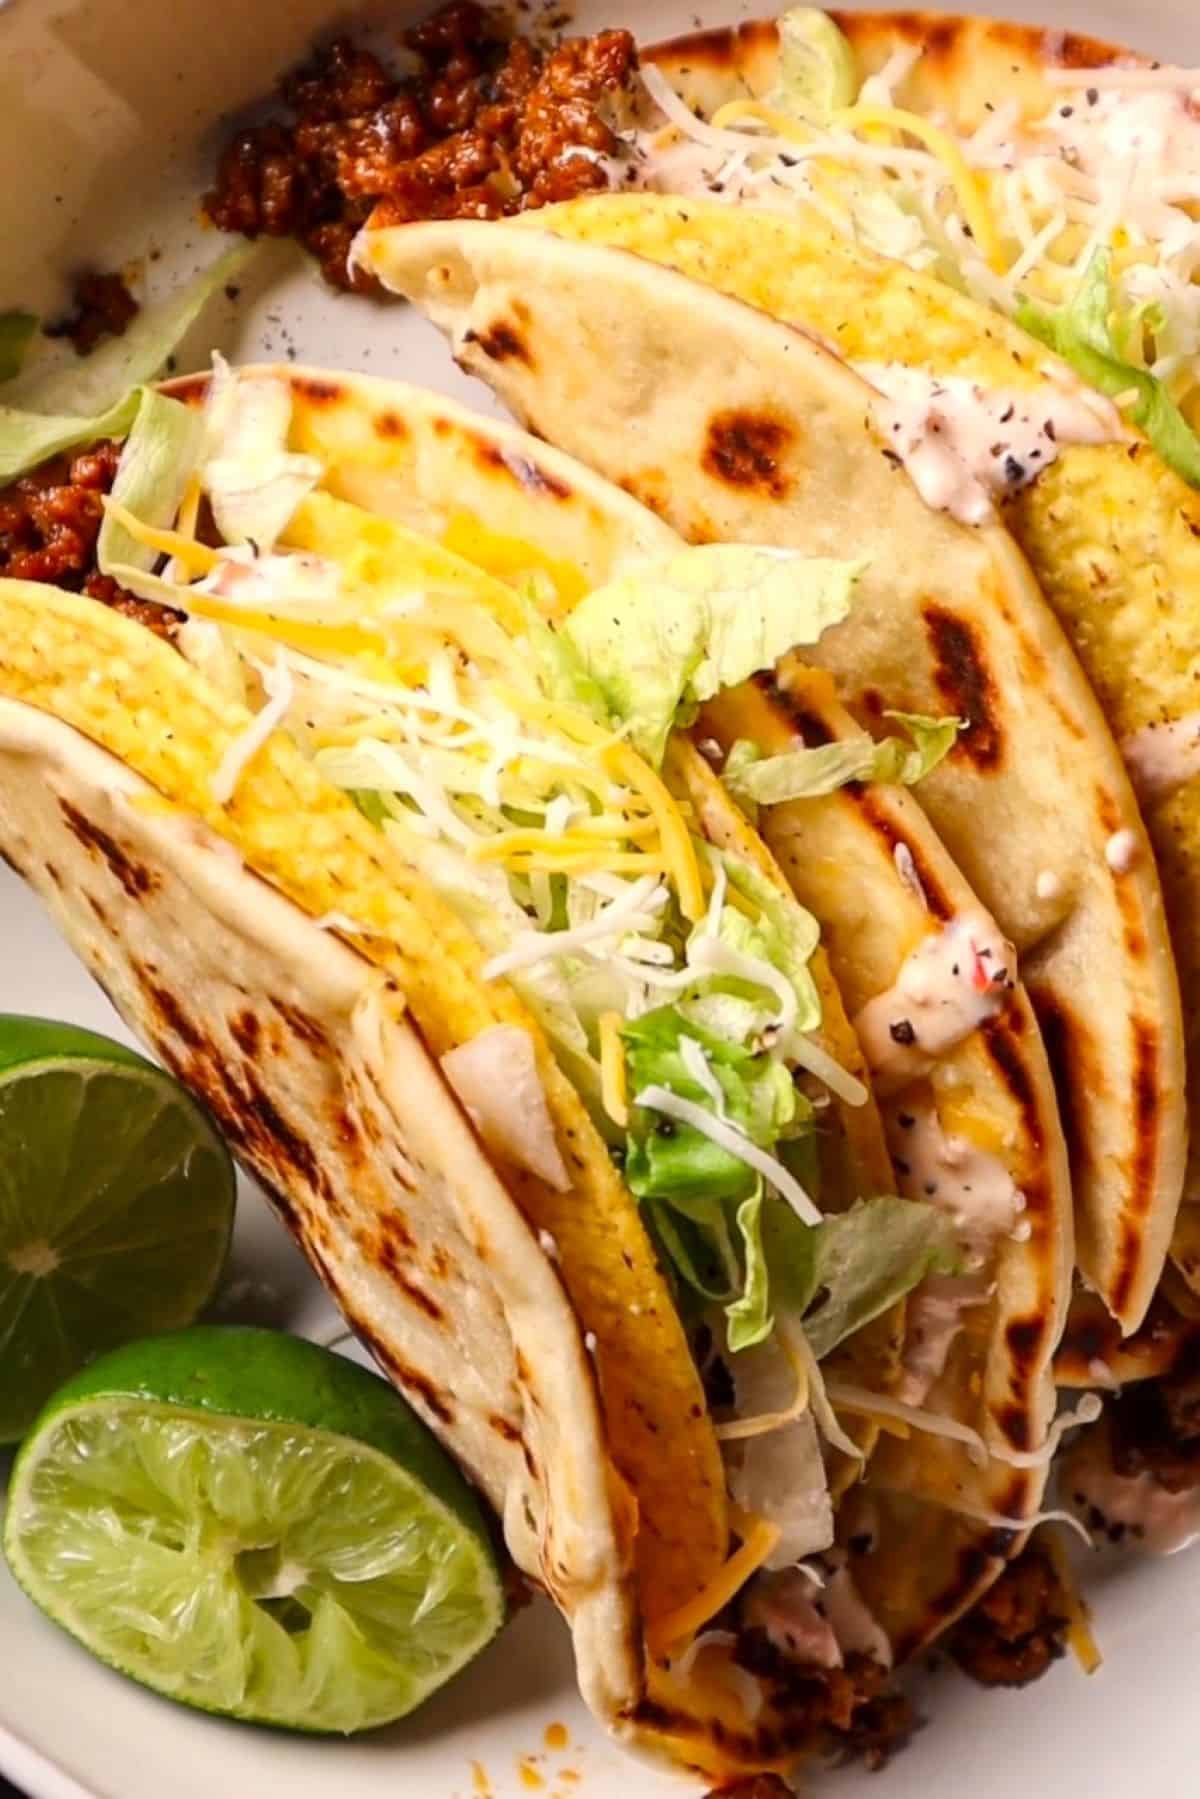
This homemade Cheesy Gordita Crunch is even better than the Taco Bell original. Crunchy taco shells wrapped in melty cheese and a pillowy chalupa shell, then stuffed with taco seasoned ground beef, homemade baja sauce, shredded lettuce, and more cheese.
Why You'll Love this Cheesy Gordita Crunch Recipe:
- Cheesy, crunchy, zesty, and savory. This recipe has it all.
- Sure, going through a drive-thru is quicker, but this recipe comes together in just 30 minutes, tastes much better, and you can load them with as much cheese and toppings as you like.
- Great for taco night, gatherings, and game-day.
Jump to:

Key Ingredients:
- Hard Taco Shell & Chalupa Shell: Pressed together with melty cheese to form that signature double layer.
- Ground Beef & Taco Seasoning: Creates the savory meat filling.
- Homemade Baja Sauce: A blend of mayo, sour cream, red pepper, garlic, and lime juice.
- Toppings: The original gordita crunch is topped with iceberg lettuce and shredded cheese, but this homemade version can be topped with any of your favorite taco toppings. Diced white onions, cilantro, pico de gallo, or even diced jalapenos.

Dietary Swaps:
- Gluten-Free: Use certified GF hard taco shells, tortillas, and taco seasoning.
- Dairy-Free: Use a dairy-free shredded cheese that melts well, and your favorite dairy-free taco sauce.
- Egg-Free: Use Veganaise in the homemade baja sauce.
- Vegetarian: Use a plant-based ground 'beef', such as Impossible Foods.
- Vegan: Follow both vegetarian and dairy-free instructions.

Recipe Variations:
- Cheesy Taco Shell: Use nacho cheese flavored crunchy taco shells.
- Use a different meat, such as ground chicken, turkey, or pork.
- Additional Toppings: Diced white onions, cilantro, pico de gallo, diced jalapenos, sliced black olives, salsa, avocado, or sliced radishes.

Tips & Notes:
- Drain ground beef of fat before adding the taco seasoning and water.
- Warm chalupa shells in the oven, skillet, or air-fryer before melting cheese on to them.
- Melt cheese fully onto the chalupa shells before pressing on the taco shells.
- Use a utensil or light weight plate to hold assembled shells in place while working on the other shells.

Storage:
- Assembled gorditas are best served immediately.
- Leftover taco meat can be stored in the fridge in an airtight container for up to 3 days.
- Leftover homemade baja sauce can be stored in an airtight container in the fridge for up to 5 days.

FAQs:
Baja sauce is a creamy, zesty sauce made with mayo, sour cream, red bell pepper, garlic, seasoning, and lime juice. It can be made spicy by adding jalapeno, and is great on tacos (especially fish tacos!), fajitas, and much more.

More Mexican-Inspired Recipes You Will Love:
- Easy Slow-Cooker Pork Carnitas
- Creamy Chipotle Shrimp
- Queso & Rice Stuffed Poblano Peppers
- Crock-Pot Birria Tacos
Recipe

Cheesy Gordita Crunch
Ingredients
For the Beef:
- 1 lb ground beef
- 1 packet taco seasoning
- ½-¾ cup water
For the Shells & Fillings:
- 4 hard taco shells
- 4 chalupa shells or soft flour tortillas
- 1 cup shredded Mexican cheese
- ½ cup shredded iceberg lettuce
For the Baja Sauce:
- ¼ cup mayo
- ¼ cup sour cream
- ½ red bell pepper seeded & roughly chopped
- 1-2 garlic cloves
- Juice of ½ lime
Instructions
- Make the Baja Sauce: Add mayo, sour cream, red bell pepper, garlic, and lime juice to a food processor. Blend until smooth, adjust seasoning to taste, then refrigerate until ready to use.
- Cook Beef: In a skillet over medium-high, cook ground beef until browned and crumbled. Drain grease, add taco seasoning and water, then simmer for 4-5 minutes longer.
- Prepare Shells: Warm chalupa shells in oven, skillet, or air fryer. Sprinkle most of the cheese (save some for topping) over each chalupa shell and melt under a broiler. Once melted, press a hard taco shell into the melted cheese, folding chalupa around it. Hold briefly so it sticks.
- Assemble: Fill each shell with seasoned beef, drizzle with Baja sauce, top with shredded lettuce, and finish with the remaining cheese. Serve immediately.
Notes
- Use a utensil or light weight plate to hold assembled shells in place while working on the other shells.
- Nutrition values are an estimate only.
Nutrition
Tried this Cheesy Gordita Crunch recipe? I'd love to hear how it turned out! ⭐ Please leave a star rating and review in the recipe card below. Your feedback helps others discover this homemade version. Enjoy, and happy cooking! Follow me on Instagram and Subscribe to my newsletter more delicious recipes, travel inspiration, and behind-the-scenes content.

Must Love Garlic says
Crunchy, cheesy, zesty, and savory. Quickly comes together and even better than the original.